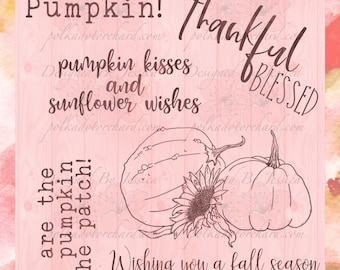
We are using The Best Pumpkin stamp set.
And I picked a past color palette from the Color Throwdown. I love their color themes!
Now let's take a peek at the card I came up with!
I love the vintage feel to my card! Not to mention, who says pumpkins always have to be orange? I printed the stamp out onto Copic friendly cardstock. This one is Cryogen White cardstock. I love it because it itsn't a super bright white and it has a bit of a metallic shimmer to it.
Here are the Copic colors I used:
Pumpkins: E79, 77, 74, 71
Stem & Leaves: YG99, 95, 93, 91
Flower center: R29, 24, 22
Flower: Y19, 15, 11
I do list my markers in the order in which I color. My preference is to color from dark to light. Just thought I'd mention it!
After I colored the image in with my Copics, I used my Scan n Cut to cut the image out with a little bit of a border. Now to get my card put togeter.
My card base is an ivory A2, side fold card. I added to different patterned papers from Authentique's Gracious paper pad. I'm not normally a vintage type gal but I really love Authentique's collections. They are cut to 4" wide and together are 5 1/4" tall. I had a pice of dark yellow organdy ribbon and a wrapped it around the pattern pieces right where they meet. I added foam tape to the back of the pumpkins and adhered them right on top of the ribbon. I made sure to keep the top of the pumpkins right below the ribbon.
The sentiment also comes from The Best Pumpkin set. I printed it on the same cardstock I used for the pumpkins so the colors would be the same. I didn't want the sentiment to be in one big block so I cut it apart. Then I turned the Hello sideways so it would fit at the top of the card. I snipped the bottom end off at an angle. I then put the 'pumpkin' portion of the sentiment below the pumpkins.
For the finishing touch I added brown and matte gold sequins in assorted sizes. That's it! I really appreciate you stopping by and I hope you will head over to Judy's blog HERE to see what she came up with!
Have a fab day!
~Kristina
Supplies used:
 Tombow Mono Multi Liquid glue Shop at: SBC | EH |
 Therm O Web Foam Tape Shop at: SBC | EH |
 Gracious paper pad - Authentique Shop at: SBC |
 The Best Pumpkin - Polka Dot Orchard Shop at: PDO |
 Copic Marker Y19 Shop at: EH |
 Copic Marker Y15 Shop at: EH |
 Copic Marker Y11 Shop at: EH |
 Copic Marker E79 Shop at: EH |
 Copic Marker E77 Shop at: EH |
 Copic Marker E74 Shop at: EH |
 Copic Marker E71 Shop at: EH |
 Copic Marker YG99 Shop at: EH |
 Copic Marker YG95 Shop at: EH |
 Copic Marker YG93 Shop at: EH |
 Copic Marker YG91 Shop at: EH |
 Copic Marker R29 Shop at: EH |
 Copic Marker R24 Shop at: EH |
 Copic Marker R22 Shop at: EH |


I'm headed to check out the other card now. Yours using the stamp set and the color combo came out great! I like how you divided the sentiment and placed the emphasis on pumpkin.
ReplyDelete