Hi friends! I'm bringing you something a little different today as I’m super excited to be guest designing for Artesprix! I’m generally a cardmaker/papercrafter but have gotten hooked on using Artesprix sublimation products. It blew me away just how easy it is to use their sublimation markers! Let’s dive in and take a look at my project.
(Compensated affiliate
links may be used – I may receive a small commission at no additional charge to
you should you make a purchase using my link.)
Assorted stamps from Altenew
Copy paper
Acrylic blocks
What are Sublimation Markers?
Sublimation Markers and Ink Pad have a special
formulation of ink. With copy paper,
home iron or heat press and a polyester or polyester coated blank you can
create your very own sublimated project.
When heat is applied it causes the inks to transfer and adhere/sink into
the blank. This becomes a vibrant, permanent
image!
Step 1: Normally you would trace around your blank to create a template area to work in. I specifically cut my paper to be smaller than the Sequin Pillow Case so no traced template needed. I printed my desired words out onto a piece of copy paper. I then used a light box to trace the letters. I also created a mask for the words.
Step 2: Once the mask was in place, I got out my acrylic blocks, stamps and black Sublimation Ink Pad. I stamped the flower and leaves stamps over and around the sentiment. I added masks as need to stamp over other images.
Step 3: Remove all the masks! I love seeing the reveal once you take all of the masks off.
Step 5: Very important! Before taping your design to the pillow case, make sure ALL of the sequins are flipped to the white side!! It’s really easy to do. I applied lots of heat resistant tape around the edges of my design. I found that the thicker paper was a little warped from all of the water I had used. I didn’t want it to move! You can also see that I have my sublimation sandwich in place. One sheet on top of my design and one on the inside of the pillow case.
Step 7: After the timer runs out it’s very important to do a peek test! Just peel back a little bit of your design and see how well it transferred. You can carefully put it back if you need more time/heat.
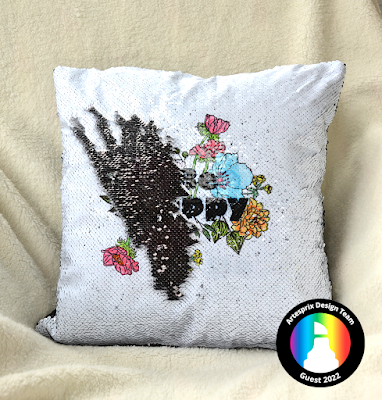
Step 8: Reveal time!! Look at this beauty!
Step 9: Insert a 16” pillow form into the pillow case. Step back and admire your work!
I absolutely LOVE how my pillow turned out! I know it will make me feel happy every time I look at it.
Are you intrigued by the mesmerizing (and easy!) world of sublimation inks and markers? Then you need to take a look at the Artesprix Iron-on-Ink Inspirational Group over on Facebook. Click HERE to check it out. Want to see all the great sublimation products and blanks? Then head to the Artesprix store to do a little shopping.
It’s been lots of fun sharing my project with you today. Hope to see you soon!
Toodles!
~Kristina
Compensated affliate links may be used - I may receive a small commission at no additional charge to you should you make a purchase using my link.
 Tonic Studios-Retractable Craft Pick Shop at: SBC | EH |
 Therm O Web Masking Magic Sheets Shop at: EH | ACOT |
 Cutter Bee Scissors - EK Success Shop at: SBC | ACOT |
 Ranger Distress Sprayer Shop at: EH | ACOT |
 Canson XL Mixed Media paper Shop at: ACOT |
16" x 16" pillow form - Crafter's Choice Shop at: ACOT |
 Freeform Greenery stamps - Altenew Shop at: Altenew |
 Amazing Things stamps - Altenew Shop at: Altenew |
 Fresh Bloom stamps - Altenew Shop at: Altenew |
 Airbrushed Flowers - Altenew Shop at: Altenew |
 Wonderland stamps - Altenew Shop at: Altenew |
 Remember This - Altenew Shop at: Altenew |


No comments:
Post a Comment